


Even though I’m a website conversion copywriter, it took me about a YEAR to revamp my website.
I know – that sounds like a really long time.
But if you’re doing almost EVERYTHING yourself, it’s not that crazy.
Even big-name brands with huge budgets have to wait at least a few months to see their new websites.
It’s not like you can just flip a switch and BOOM! There’s your new website (I WISH it worked like that).
There’s a TON of work that takes you from “bad” to “badass” website – and today, I’m going to take you through EVERY step of the process so you can see what it really takes.
I also broke out the steps by season so you can get a better sense of the timeline, as well.
I hope you find this helpful; if you have any questions along the way, comment below or reach out to me at any time: hello@anniemaguire.com
Let’s dive in!
P.S. Keep in mind, this timeline was true for me, but it doesn’t mean YOUR website will take that long; some websites get up and running within 2-3 months while others take longer (more on that at the very end of the article).
🌸 SPRING 2023 (1 YEAR AGO):
STEP 1 – CLARIFYING NEEDS / GOALS
During my last website revamp in 2018, my main goal was to build a website with a robust portfolio so I could showcase my work to potential clients.
But this time around, things were a little bit different.
Not only had my business changed significantly, but I had different goals/needs like…
✧ I needed more than just a portfolio
I needed a serious showpiece that would help me demonstrate what I can do for clients.
✧ I needed to better explain my offering
I’m not just a conversion copywriter. I’m a WEBSITE conversion copywriter who serves a particular type of audience. That needed to be CRYSTAL clear. And I wanted to better explain my process and why clients love it.
✧ I needed to make my other offerings more accessible
I wanted to promote my newsletter and courses, but without competing with my primary offer (the 1-on-1 service).
✧ I needed to do a better job of showcasing my expertise
By strategically integrating testimonials, case studies, and stats in the more prominent ways. I wanted leads to come to my site and FEEL my expertise in the experience (not just in the words).
✧ I needed to tell my story and show my face more
I needed to connect with my audience on a more personal level. I wanted to show that I’m a real person they would enjoy working with.
There were a million other little things I was also thinking about, but those were the main goals.
To get clarity, I started by completing my Discovery Questionnaire – aka the same doc I have ALL my clients fill in when we start a new project.
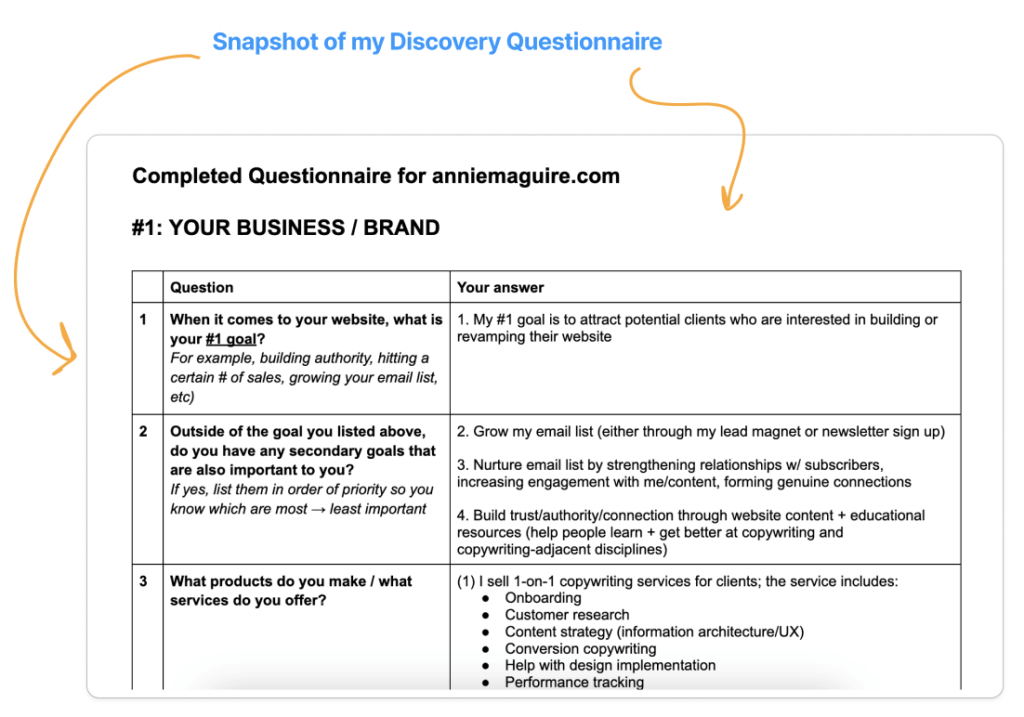
Answering basic questions about my goals, business, product, etc surfaced important details that SIGNIFICANTLY influenced my approach (and I returned to my responses throughout the project to make sure I was on the right track).
Once I had clarity around my goals, I started thinking about the people I needed to hire to bring my vision to life.
☀️ SUMMER 2023:
STEP 2 – FINDING A DESIGNER / DEVELOPER
In June I got an email from Tarzan Kay (she’s an email copywriter) about her website revamp.
After checking out her new site, I immediately contacted the website designer (Gigi from One6Creative).
While I would never normally do this, I didn’t even look at other website designers/developers – I really liked Gigi’s portfolio and process and just went with my gut.
Thankfully it paid off (phew!), but for anyone else doing a website revamp, I definitely recommend looking at different options to make sure you go with the right person.
Remember, a website revamp is not cheap – and it can take several months – so you want to make sure you like AND trust the people you’re working with (and that they will show up consistently over time).
Gigi definitely fit the bill for me and I’m SO glad I went with her!
Not only is Gigi an incredibly talented designer, she’s very patient and collaborative; she’s receptive to feedback and takes direction.
And she was always able to come up with creative solutions for whatever challenges came up during the project.
She really was perfect for my project and I’m so grateful I found her.
STEP 3 – FINDING A PHOTOGRAPHER
When I lived in NYC, finding an amazing photographer was really easy as there are incredible artists on every block.
But now that I live in Connecticut, finding a good photographer – who has experience with the kind of shoot I wanted to do – felt like finding a needle in a haystack.
Most photographers in my area focus on family photoshoots and weddings, not website photography, so right off the bat I was working with a smaller pool of candidates.
To help narrow my search, I searched for things like “CT lifestyle photo shoot,” “CT photographer personal branding” and “CT photographer professional headshots.”
While most of the results turned up headshots that looked like “school portrait meets glamor shots session” I finally found a few options that didn’t make me cringe.
After perusing their Instagrams, I reached out to a few photographers, including Lindsey Turner, who ultimately got the job.
I went with Lindsey because she had experience doing the kind of shoot I was looking for and even had a page on her website dedicated to that service with examples.
Lindsey also had a clear process (similar to my own) and clear pricing so I had a sense of what it would be like to work with her before we ever spoke.
Finally, Lindsey was professional and responsive. During our first call, Lindsey shared her clear, hands-on process that showcased her expertise and made me feel like I was in good hands.
She also helped me through the logistics of the shoot, including choosing different colors and outfits that could serve my business beyond the website (I love a big-picture thinker!).
Once I had my team locked in, I started working on the logistical side to make sure I would be set up for success.
🎃 FALL 2023:
STEP 4 – CONDUCTING RESEARCH
Like any website revamp project, I started by interviewing some of my existing clients who represent my “ideal” client.
This helped me get a better sense of their pain points and goals, as well as insight into their process when it came to hiring me as their website conversion copywriter.
It also helped me get copy ideas so I could write words that would resonate with future clients.
If you don’t already have it, I definitely recommend checking out my FREE customer interview template which has sample questions and an intro/outro script you can use when interviewing customers.
During this phase I also did a little competitive research, checked out my site analytics, and read through client reviews to get insights I could use to help me shape the copy and IA.
Just like with my clients, I put everything into an Insights Report so I could see all of the key information in one clear, easy-to-read place (and continued to refer back to this document throughout the entirety of the project).
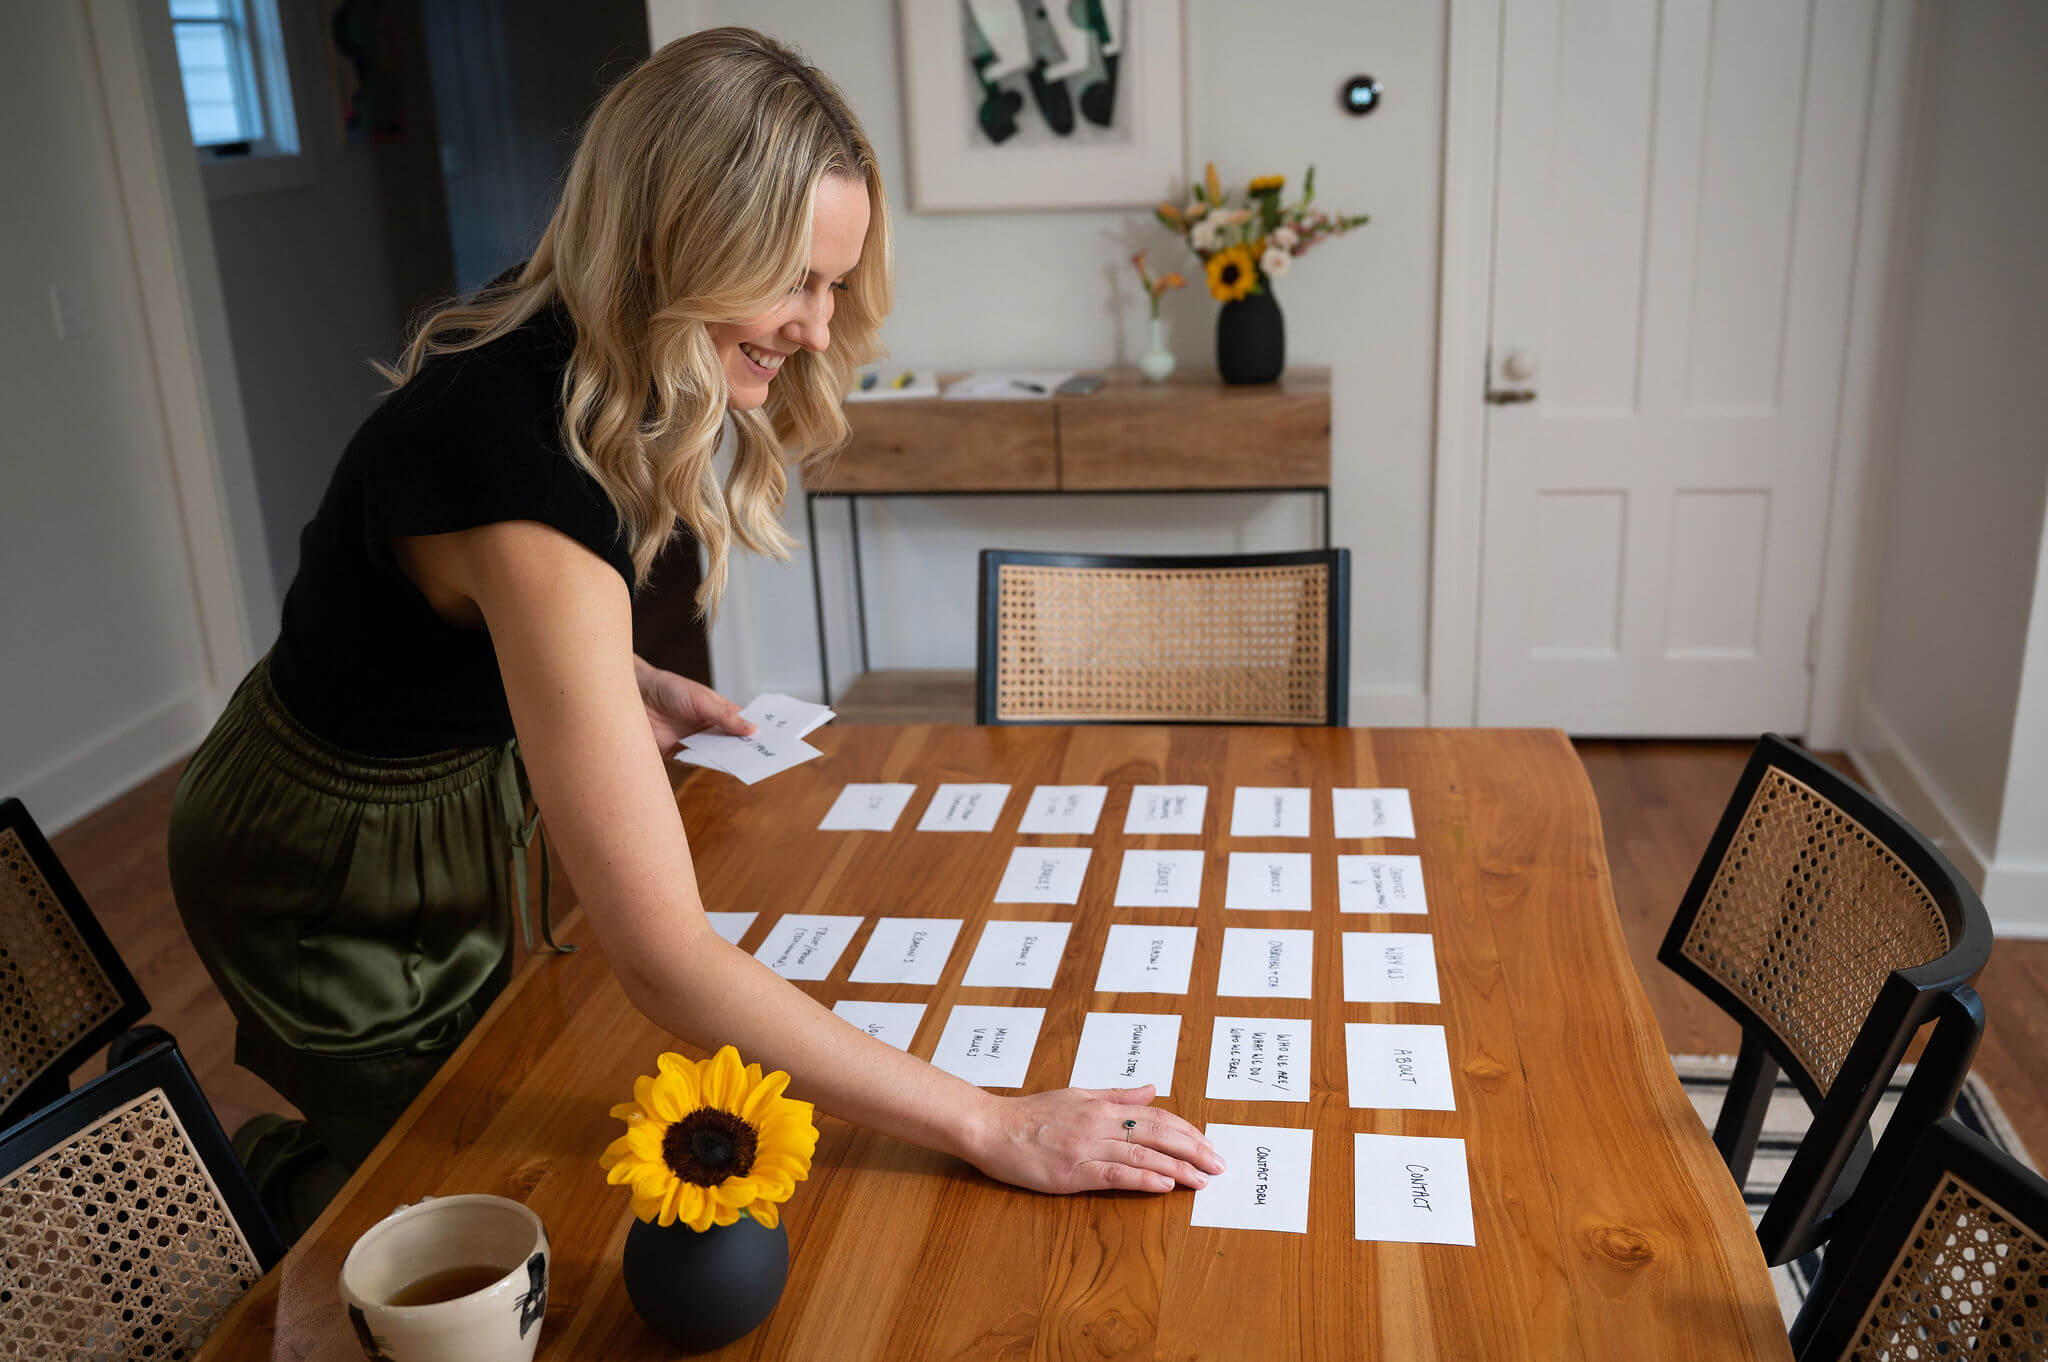
STEP 5 – THE PHOTOSHOOT (PLANNING + SHOOTING)
When I created content for Smirnoff and Guinness, one of my jobs was to coordinate product/lifestyle shoots AND actually shoot the photos, too (yeah, it was kinda the wild west back then …).
So when it came time for me to essentially produce my own shoot, I was all over it – creating my shot list, picking out props (notecards, pens, plants, books, flowers, etc), selecting wardrobe (including buying some new clothes), booking a hair stylist, planning my makeup, staging areas of my home, and more.
Because I had prepared so much in advance, all I had to do was show up that morning and TRY to get comfortable while a stranger took photos of me (not exactly my idea of fun, but the photos turned out great and I was very happy with the final result).
❄️ WINTER 2023:
STEP 6 – VISUAL IDENTITY / BRANDING
Even though I worked with a designer to relaunch my website in 2018, we didn’t really go through a proper branding process.
My site was fine, but I didn’t have a true logo, brand colors, special fonts, or anything that really felt like “me” in any sense of the word.
At the time this was OK, as I was more focused on the portfolio, but when I began marketing my business more regularly, my lack of branding really started to bother me.
This is one of the reasons I was so excited to work with Gigi – she wasn’t just revamping my website, but helping me build my visual identity, too.
To start the process, I pulled a ton of references (onto a Pinterest board) which helped me get clearer on what I was looking for in terms of a visual identity and also provided Gigi with clear direction on how to proceed.
I typed in things like “minimalist website design,” “feminine website design,” “colorful branding” to help me find references that fit with what I was looking for.
Because I work with a lot of male clients, I didn’t want my site to feel “too girly” – I needed it to feel somewhat “neutral” and Gigi did a great job of balancing that.
(P.S. with a website revamp, there are a million little things LIKE THAT ^ you need to think about when making choices around design, language, etc)
We went through several rounds of iteration before landing on the right colors, logo, etc – but we didn’t actually finalize the visual ID until we got to the website mockups.
Once I was able to see everything in action, it was much easier for me to see what was missing, what needed to be amped up, etc and Gigi did a great job of delivering on what I was envisioning.
STEP 7 – CREATING THE WEBSITE STRUCTURE (IA)
Even though I had created a very ROUGH version of my IA months before I contacted Gigi, I knew it wasn’t in a final state.
I had a general idea of what pages I wanted for my site, but I hadn’t fully mapped out the content in detail so I went back to my rough version and started thinking through the copy from a high-level perspective.
I added more detail and copy ideas, updated the names of pages, moved pages around, created my primary and footer navigation, and added in the sub pages I would need for my site.
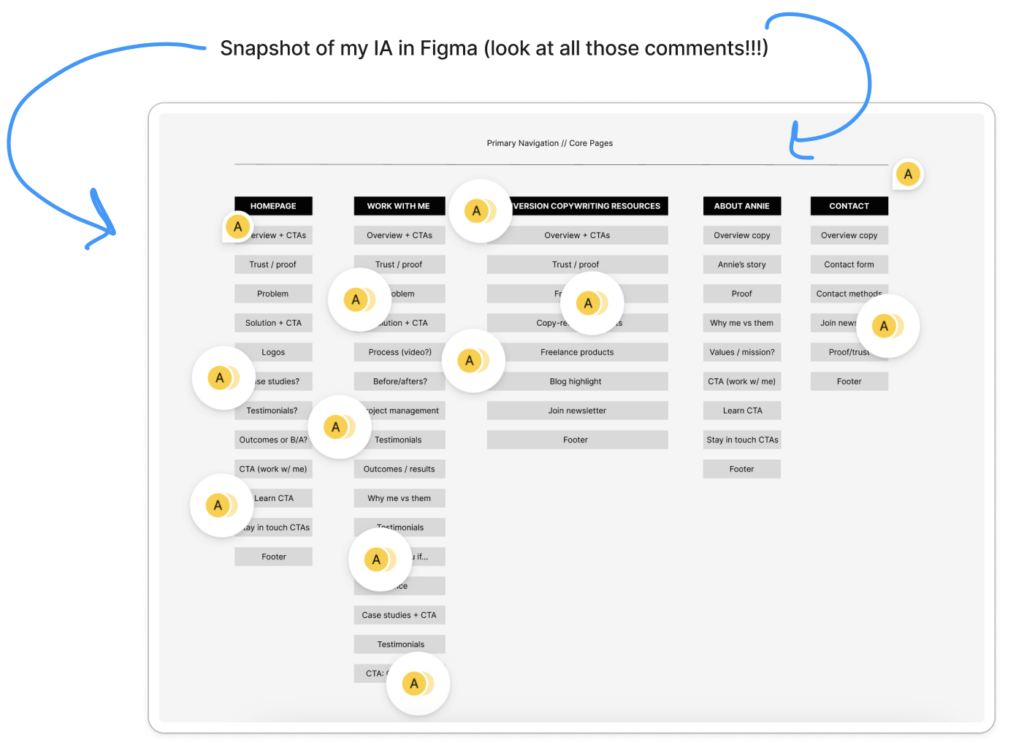
Once we got into the copywriting and design phase, things changed … a lot.
But that was OK – iterating on your initial IA is very typical, as what works in a theoretical state (like in Figma or a Google Doc) doesn’t always perfectly translate to a live design.
STEP 8 – WRITING THE WEBSITE COPY
I told myself I was going to write all the copy for my new website during my winter break between Christmas and New Year’s.
BUT, my dog got REALLY sick and most of my “vacation” was me and my husband taking care of her and running her back and forth from the hospital.
Despite this, I somehow managed to scrape together the copy, but because it was written under duress, I wasn’t 100% happy when I sent it to Gigi.
Thankfully, I was able to make changes once it went into design and got it into a place that I was very happy with.
The point is, copy doesn’t always work perfectly when it goes into design, so you have to be willing to make changes once you get to that stage.
Most of the changes focused on making the copy clearer, trimming out unnecessary content, and infusing the copy with more personality.
As you can see, writing the copy is only one TINY part of this whole long process.
I will say, however, that writing the copy for your own business is SO MUCH HARDER than writing it for a client.
It took me longer than it normally takes because I second guessed myself a lot and really struggled to “get it right” – ESPECIALLY on the Homepage (that page was a mind fuck for me).
I think I got caught up in all of the potential options or ways the copy COULD HAVE GONE – and that really slowed me down.
But in the end, I was very happy with where the copy landed (and the good news is, I can always change it as needed …. Just one of the “pros” of being a conversion copywriter! 🙂
🌈 SPRING 2024:
STEP 9 – TRANSLATING THE COPY INTO DESIGN
As I do with ALL my clients, I worked very closely with Gigi during the design translation process.
I reviewed each page with a fine-tooth comb to make sure the copy not only “worked” in design (meaning it looked right, flowed right, etc), but that it was reading well, it was effective, and free from typos.
I had to make sure the UX made sense; that it felt clear, intuitive, and easy to use.
And I needed to make sure the copy/design worked well on different devices.
This is not an easy process, especially when you’ve written the copy yourself (it’s not always easy to spot errors) but thankfully I’ve been doing this a long time so I know what to look for and how to fix things pretty quickly.
Gigi was also great at coming up with creative solutions when I had an issue or needed something to look different for whatever reason (and being patient when I found *yet another* thing that needed to be tweaked).
STEP 10 – LAUNCHING THE NEW SITE (!!!)
Once the copy was in design and ready to go, I still had to QA the site.
I had to make sure everything was working properly, rendering correctly, linking to the right things, etc.
Again, this is a painstaking process, but extremely necessary as you don’t want to send clients to a site with broken links or typos.
We also ran up against some technical issues we had to deal with – I won’t go into the boring details, but it took a while and Gigi is a saint for helping me figure it all out (she also created a very cool “coming soon” page for my site while the backend stuff got updated).
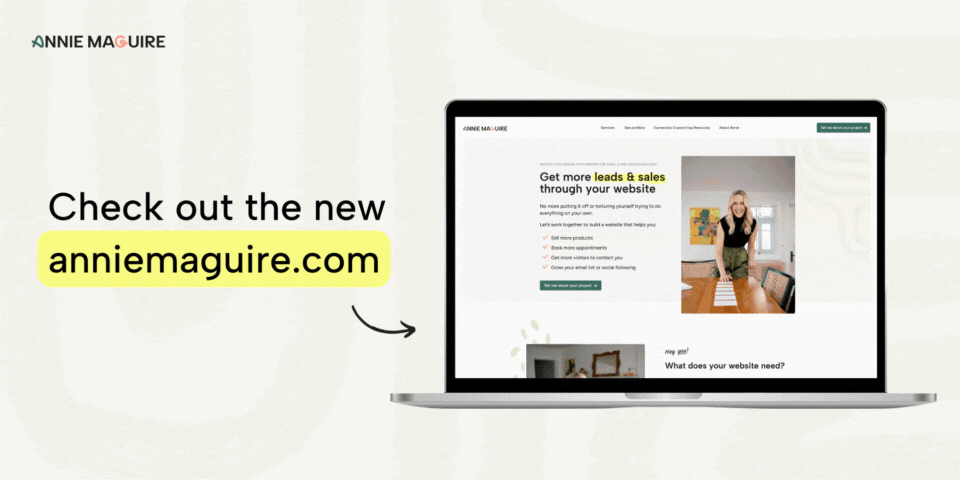
Once everything looked good, Gigi published the site, and we went LIVE!
✨ Life after launching
Since launching the new site I’ve gotten incredible feedback from clients, peers, and potential clients, which makes the hard work (and year-long commitment) feel worth it.
I FINALLY feel excited sending leads to my site knowing it’s clear, intuitive, and reflects the kind of work I actually do (website conversion copywriting!).
I feel good knowing visitors of all types will be able to easily navigate my site – and find what they’re looking for quickly and easily.
I feel more confident charging higher rates because I know I’m worth it – and I feel like my new site validates that.
I feel confident reaching out to podcasts and other creators who might want to collaborate.
And I feel like I finally understand what it’s like for my clients when they go through this process with me … which is just the cherry on top 🍒
As a quick reminder, the timeline for every site is different.
The timeline for revamping a website depends on A LOT of factors, including:
- The type of biz / product
- The current state of your site (vs where you want to go)
- Number of pages / amount of content
- Your team (how many people are helping you….and if they’re good at their jobs lol)
- Your budget (lower budget usually means more DIY, slower process, etc)
- Timing (your own schedule, availability of your team, responsiveness, etc)
- Amount of feedback
- Technical complications
- And more!
Need helping building or revamping your site?
Let’s talk!
Hit reply or head over to this page on my site to tell me more about you and what you’re looking for.
DIY’ing your site?
Check out my course, How to Build Websites That Convert, which takes you through the exact process I just shared above.
The only thing the course doesn’t cover is photography and design; everything else (getting clarity on your biz/goals, researching your customers, building your IA, and writing your website copy) is included.
The course is designed to be completed within 4 weeks, but you can do it at your own pace.
I hope you found this little “guide” helpful; if you have any questions, comment below or reach out to me directly: hello@anniemaguire.com


